If You Cant Find A Colour You Need Let Us Know & We Can Make It!
Join Our Distribution Network Europe Or Worldwide > Contact us
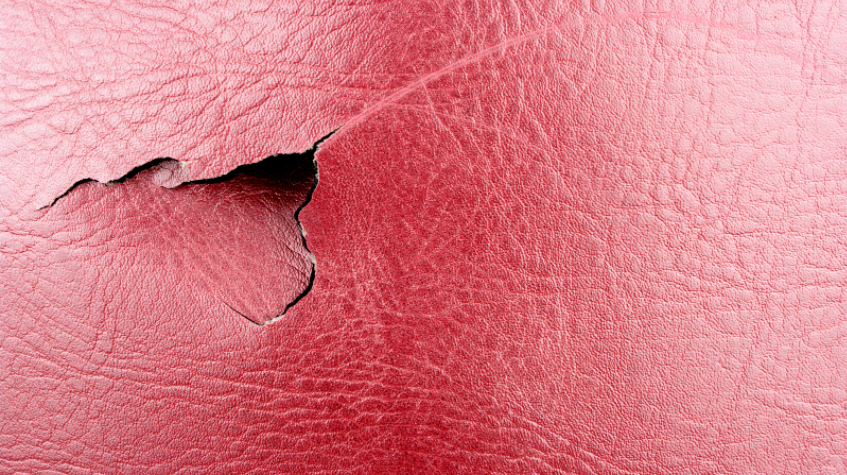
The emotions associated with seeing a tear in a favourite leather item are wide-ranging, and many people are genuinely upset about this situation. However, in many cases, it is possible to repair a tear in the leather. You can even do it from the comfort of your home.
Leather repair kits are available commercially, and while each package is likely to vary, there is some degree of uniformity in what it should contain.
Therefore, whether you compile a leather repair kit or buy a pre-packaged one, you should look to have the following in your complete leather repair kit:
The amount of liquids you need depend on how much repair work you undertake. You can enhance your repair kit by buying rubber gloves, cloths, paper towels, aprons and anything else which keeps the general area clean while working.

When fixing leather tears, leather glue is an intelligent investment, and offers very strong repair support to fix a tear in leather furniture.
No matter the leather product you wish to repair, many steps are the same. Later on, this guide will discuss any variations you need to consider for specific leather repairs, but this overview provides an excellent starting point for rescuing leather items:
Start by examining the tear, looking out for any issues. You should also clean the leather surface at this point and then allow it to dry. Make a careful note of the leather colour, and try to buy colour compounds that match the leather.
If there are worn edges or trim on the tear, cut them off. The same goes for shredded or thin layers of leather. Tidying up the leather before you repair it minimises the risk of future tears, making the tear easier to repair.
If there are small tears, you can repair the tear by sticking the torn piece back in place and using leather filler cream to smooth it out. If this isn’t possible, you will need to use a patch.
Take a piece of patching fabric larger than the tear you need to repair. If you feel more confident in measuring the incision and then cutting the fabric accordingly, do so. The material should be 2.5cm bigger than the tear all around the crack.
The patch needs to be bigger so you can glue the edges to stick to the fabric around the gap.

The next stage involves putting the fabric in place, and the best way to do this depends on the size and scale of the item you need to repair.
If you can access the underside of the leather, putting the material in place is simple. Turn the item over, apply accordingly to cover the tear fully and stick it onto the leather material with a small amount of glue.
If the item is small or light, you should be able to slide the leather patch beneath the fabric using tweezers.
Focus on one side of the tear at a time, and when you are happy with the initial positioning, attempt to slide in the other side of the fabric. Once you are confident that the fabric fills the hole, smooth it out.
As stated above, applying glue is a simple process when placing a fabric on the underside of a leather tear. However, in the case of sliding the material into position, the work is slightly trickier but still manageable:
A handy tip when fixing a small tear and you are struggling to lift the gap to secure sub patch is to use a toothpick or pin to prop the leather up, and then you can apply the glue.
If your leather repair kit contains a heat patch rather than glue, you should use an iron or hair drier on the joined area, which activates the adhesive.
With the fabric in place, you want to fill the seam in the leather item, and you should use a clean knife to apply heavy filler. At this point, don’t worry about the colour of the filler against the leather finish; you can rectify any issue with a leather colourant.
Apply the leather filler in thin layers at a 45-degree using a palette knife or thin edge. If you apply too much, wipe the excess material off with a paper towel.
Please allow ample time for the filler to dry, which sometimes takes up to 24 hours. Once dried, review the crack; if you feel more filler is required, repeat the work. Many people sand the filler down at this point, creating a smoother finish.
With the filler in place, the tear is covered, but it might need to look better. You want the hole to be as unobtrusive as possible, which means colouring the filler is intelligent.
If you have a leather colourant or dye which matches the leather, you can use this directly. If you don’t have an immediate match, you’ll need to mix shades to create the perfect colour. Start with a relatively close base, and mix white or black, dependent on the colour you need to obtain.
If the leather is old or faded, it might be challenging to get an exact match, so try your best to get as close as you can.
Apply the mixture with a cotton swab, colouring the filler and minimising any notable repair work. (If the gap is large, use a small paintbrush instead.)
Please allow ample time for the mixture to dry, up to two hours, but please read the manufacturers’ instructions for proper guidance.
If you have a leather finishing product, apply this to the gap. Then allow it to dry, and you’ll have great-looking leather again.
Repairing a tear in a leather jacket isn't time consuming and the same procedure applies. If there is no lining in the coat, you can usually access both sides of the leather, which makes adding the patch simpler. If there is a lining, please follow the instructions for sliding a patch into a tear.

If you cannot remove the leather car seat from the car interior, you’ll have to repair them in a cramped space. This adds an awkwardness to the fix, but the overall process is the same when working on leather car seats.

The biggest issue in repairing a tear in a leather couch is the size of the tear and its placement. If you flip the leather couch over and work on the underside of the sofa, this should make the fix easier.
These steps apply to faux leather too, and will invigorate a damaged area. The cost of replacing leather furniture, such as a leather sofa or leather couch is expensive, which is why knowing how to insert sub patch and glue a fix over several thin layers is useful information to have.